So you have this amazing idea for an app, one that addresses an important issue, serves a particular demographic, or simplifies a process that is overly complicated. That initial motivation is very strong, but transitioning a blueprint to an actual app that users can download can seem overwhelming.
What is the first step?
In this guide, I will serve as your navigator, guiding you one step at a time in getting the app you envisioned to market. Rather than focusing on the theory, we will engage with the practical realities of the app development life cycle, a seven stage model that will take your dreams and turn them into a usable, functional product. Whether you are the founder of a start up, a product manager in an established firm, or an entrepreneur with a hobby project, this is your first step in understanding the journey and in turn, achieving success.
Step 1. The Strategic Foundation: Why Comes Before How
At this stage, you are not going to be writing code. The most important part of designing an app occurs on whiteboards, not in IDE. This is the product vision stage, and the most important assumptions you will need to make will be at this stage.

Think of this as your app's business plan. You must answer foundational questions:
- Who is this for? Define your target audience and create user personas. Are they busy professionals, casual gamers, or on-the-go shoppers?
- What problem do I solve? Clearly articulate the unique value proposition. Does your app save time, save money, or provide a unique form of entertainment?
- Who else is out there? Conduct thorough competitor analysis. What do similar apps do well? Where do they fall short? Your opportunity lies in the gap.
- What is the core feature set? Resist the urge to build everything at once. Identify your Minimum Viable Product (MVP)—the simplest version that delivers core value.
Outcome: A clear product strategy document that aligns your entire team and serves as your North Star throughout development.
Step 2: Analysis and Planning -- Building Your Blueprint
With a validated strategy, it's time to get tactical. This step translates your vision into an actionable mobile app development plan.

- Define Functional Requirements: Detail every feature. "User login" becomes: "Users can sign up via email or Google, with two-factor authentication enabled."
- Create a Technical Specification: Choose your tech stack. Will you build natively for iOS (Swift) and Android (Kotlin), or use a cross-platform framework like React Native or Flutter? This decision impacts your team, budget, and timeline.
- Build a Roadmap: Break the project into sprints or phases using an Agile methodology. This creates a realistic timeline and sets clear milestones.
- Assemble Your Team: Define the required roles: Project Manager, UI/UX Designer, Front-end and Back-end Developers, and QA Engineers.
Outcome: A detailed project roadmap, technical specifications, and a clear understanding of the resources required.
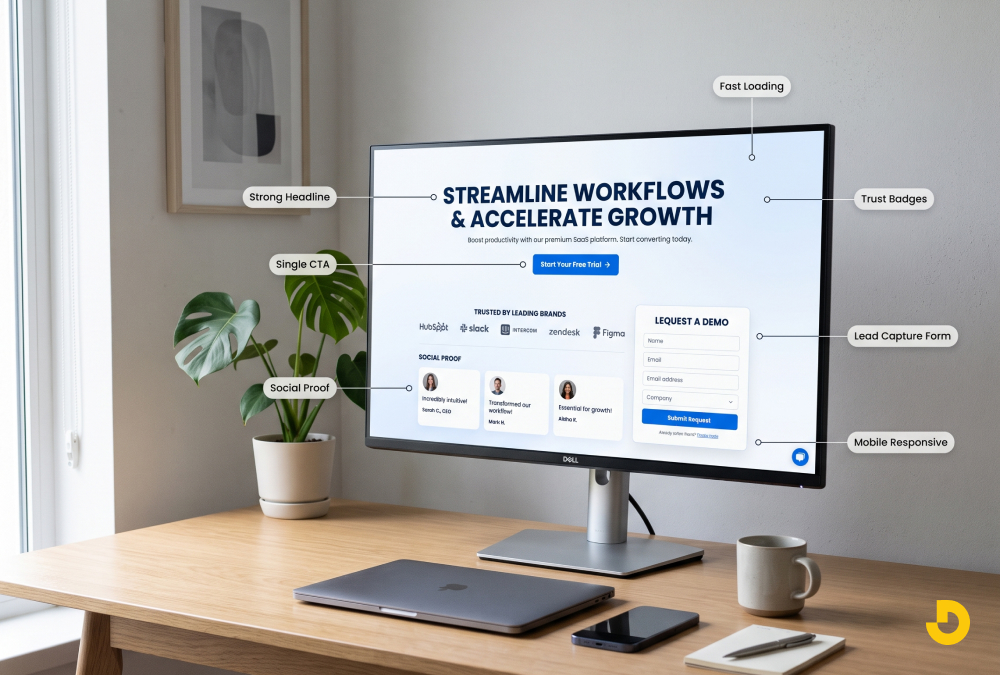
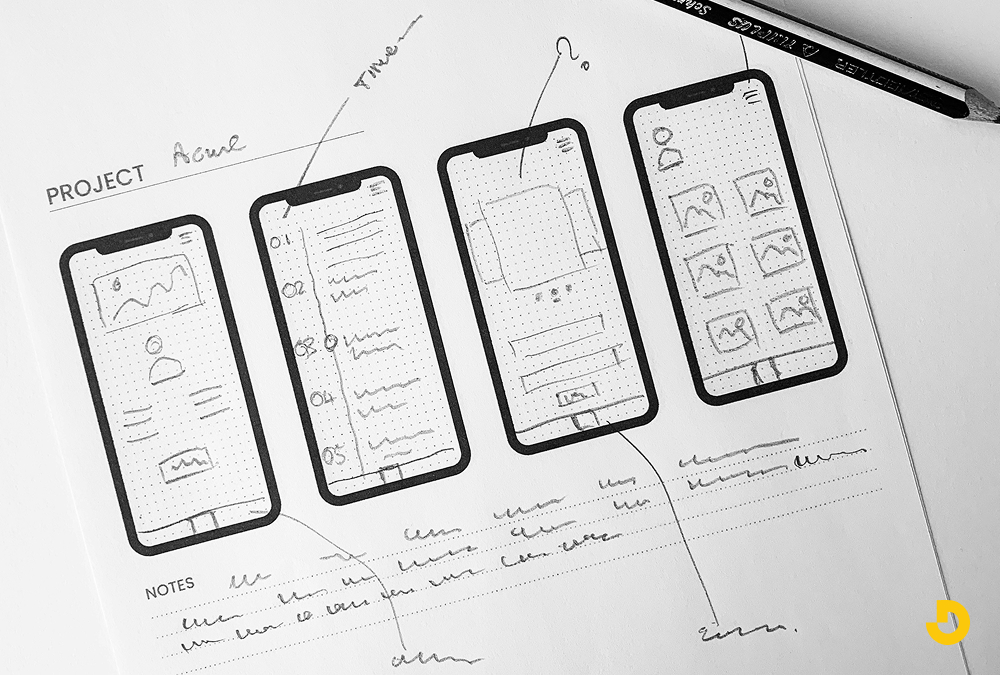
Step 3: UX/UI Design -- Crafting the User's Experience
This is where your app starts to take visual shape. Great design isn't just about looking pretty; it's about creating an intuitive and enjoyable journey for your user.

- Information Architecture (IA) & Wireframes: Map out the user flow. Sketch the basic structure of each screen with wireframes, focusing on layout and navigation without any visual design. Tools like Figma or Adobe XD are perfect for this.
- UI/UX Design & Style Guide: Apply your brand's visual identity. Designers create high-fidelity mockups, establish a color palette, choose typography, and design icons. This forms a style guide to ensure visual consistency.
- Interactive Prototypes: Build a clickable prototype that simulates the app's functionality. This is invaluable for usability testing—gathering early feedback on the flow and feel before a single line of code is written.
Outcome: A complete, visually designed, and user-tested prototype of your entire application.
Step 4: Agile Development -- Bringing the Design to Life
Now, developers turn the designs into a working application. Modern teams use an Agile development approach, building the app in iterative, two-week sprints.
- Front-end Development: This is the "client-side" workeverything the user sees and interacts with. Developers implement the designs, ensuring smooth animations, responsive layouts, and a polished interface.
- Back-end Development: This is the "server-side" engine. Developers build the database, server logic, APIs (Application Programming Interfaces), and any admin panels. This powers user accounts, data processing, and integrations.
- Sprint Cycles: The work is divided into sprints. At the end of each sprint, you have a working, albeit incomplete, version of the app to review. This allows for continuous feedback and course correction.
Outcome: A fully functional, coded version of your mobile application, ready for rigorous testing.
Step 5: Rigorous QA Testing -- Ensuring Quality and Performance
An untested app is a recipe for negative reviews and uninstalls. Quality Assurance (QA) is a non-negotiable phase dedicated to finding and fixing issues.
- Functional Testing: Does every button, form, and feature work as specified in the requirements?
- Usability Testing: Is the app intuitive and easy to navigate for real users?
- Performance Testing: How does the app handle slow networks, low memory, or a surge of users? Is it optimized for app performance and battery usage?
- Security Testing: Are user data and transactions secure? This is critical for building user trust.
- Compatibility Testing: Does the app work correctly across a range of devices (different iPhone and Android models) and OS versions?
Outcome: A stable, secure, and bug-free application ready for public release.
Step 6: Deployment and Launch -- Hitting the "Publish" Button
Getting your app into the Apple App Store and Google Play Store requires more than just an upload.
- Store Assets: Prepare all required materials: compelling descriptions, eye-catching screenshots, a promotional video, a recognizable app icon, and relevant keywords.
- Developer Accounts: Set up paid developer accounts for Apple ($99/year) and Google (one-time $25 fee).
- Submission & Review: Submit your app and wait for review. Apple's process is typically more stringent and can take several days. Google Play review is often faster.
- Launch Plan: Coordinate your launch! Line up PR, social media announcements, and initial marketing efforts to drive those crucial first downloads.
Outcome: Your app is live and available for download worldwide.
Step 7: Post-Launch: Maintenance, Updates, and Growth
Your job isn't over at launch; it evolves. A successful app requires ongoing attention.

- Monitor & Analyze: Use analytics tools (like Firebase or Mixpanel) to track user behavior, retention rates, and crash reports.
- Regular Maintenance: Release updates to fix bugs, ensure compatibility with new OS versions, and improve performance.
- Iterate & Improve: The best apps are never finished. Use user feedback and data to plan new features and enhancements for future updates.
- Marketing & ASO: Continue app store optimization (ASO) to improve your visibility in search results and grow your user base.
A living, growing product that continues to meet user needs and drive business value over time.
| Step # |
Phase Name |
Key Activities |
Main Outcome |
| 1 |
Strategic Foundation |
Define target audience, value proposition, competitor analysis, MVP identification |
Product strategy document that serves as North Star |
| 2 |
Analysis & Planning |
Define requirements, choose tech stack, build roadmap, assemble team |
Detailed project roadmap and technical specifications |
| 3 |
UX/UI Design |
Create wireframes, design mockups, build interactive prototypes |
User-tested, visually designed prototype |
| 4 |
Agile Development |
Front-end development, back-end development, sprint cycles |
Fully functional, coded application |
| 5 |
QA Testing |
Functional, usability, performance, security, and compatibility testing |
Stable, secure, bug-free application |
| 6 |
Deployment & Launch |
Prepare store assets, set up developer accounts, submit for review, coordinate launch |
Live app available for download worldwide |
| 7 |
Post-Launch |
Monitor analytics, perform maintenance, iterate features, continue ASO |
Living product that grows with user needs |
Conclusion: Your Roadmap to a Successful App Launch
Building a mobile app is a significant undertaking, but it doesn't have to be a mystery. By following this structured, seven-step mobile app development process, you move from a risky, ad-hoc project to a managed, predictable journey. Each phase builds upon the last, ensuring that your final product is not only well-built but also desired by your market.